
Outdoor quartz tile installation works best when the product, support method, drainage route, joints, edges, and expected loads are designed as one exterior system. In many markets, “outdoor quartz tile” or Shiying zhuan (石英砖) is a trade name for a stone-look porcelain paver, not a slab of natural quartzite and not resin-bound engineered quartz. Confirm the exact product first, then use only an exterior installation method approved for that product and site.
A finished patio should feel calm underfoot and welcoming around a table, garden, or evening light. A courtyard or terrace can express a wish—a medium through which people hope to bring about health, harmony, peace, or a specific outcome in life. In a home shaped around family gathering, that steady sense of ping’an ruyi (平安如意)—peace and fulfillment—begins with the unseen work below the surface: stable support, a continuous water path, safe transitions, and details that can be maintained.

Start by naming the material correctly
| Name used on a quotation | What it may actually mean | Why the distinction changes installation |
|---|---|---|
| Outdoor quartz tile / Shiying zhuan (石英砖) | Often a market name for a stone-look porcelain tile or load-bearing porcelain paver | Use the exact porcelain product’s approved bonded, aggregate, or pedestal detail |
| Outdoor porcelain tile | A porcelain tile rated for a particular exterior use | A thinner tile usually needs continuous bonded support; exterior approval is product-specific |
| Porcelain paver | A thicker, self-supporting exterior porcelain unit in some product lines | Some units permit aggregate or pedestal installation, but span and support layouts remain product-specific |
| Natural quartzite | A natural metamorphic stone | Stone movement, moisture sensitivity, staining, thickness variation, sealing, and mortar compatibility require their own review |
| Engineered quartz | Quartz aggregate bound with resin | Exterior heat and ultraviolet exposure can conflict with the product’s intended use; written exterior approval is essential |
| Sintered stone / porcelain slab | A large manufactured surface with its own composition and backing | Do not assume a countertop or façade slab is a ground paver |
| PC or concrete paver | Precast concrete paving, although “PC brick” is used inconsistently in some markets | Base, jointing, compaction, edge restraint, and load behavior differ from porcelain |
| Granite paver | Natural igneous stone | Stone thickness, finish, absorption, bedding, and dimensional tolerances need a stone-specific detail |
Do not use one label as proof of composition, origin, body color, absorption, slip resistance, or traffic capacity. Claims such as “90% quartz,” “fired at 1200°C,” “double-zero absorption,” “full body,” “18 mm,” “R11,” or “vehicle rated” describe individual products or marketing positions, not every tile sold under the quartz name. Ask for the exact SKU, declared use, format, thickness, finish, installation limitations, and current manufacturer instructions.

Choose one complete installation system
The safest early decision is not “dry or wet?” but “which complete assembly carries this product, in this place, to a maintained outlet?” Bonded tile, semi-dry mortar beds, unbonded aggregate, pedestal systems, and drainage-mat assemblies are not interchangeable versions of the same method.

| System | Typical setting | Water route | How repair usually works |
|---|---|---|---|
| Bonded thin-bed installation | Exterior-rated tile over a sound, prepared concrete or approved deck assembly | Surface fall plus the specified waterproofing, drainage, and termination details | Localized removal is possible, but bonded layers and waterproofing need careful protection |
| Semi-dry or dry-pack mortar bed | Projects designed for a mortar-bed assembly and height correction | Depends on the designed membrane, drainage layer, weep route, falls, and joints | Repair is invasive because the paver and mortar bed act as a built assembly |
| Sand or crushed-aggregate installation | Ground-level patios and paths using pavers specifically approved for unbonded installation | Surface runoff and/or infiltration through open or filled joints into a stable free-draining base | Units can often be lifted and the bedding corrected, provided edges and base remain stable |
| Adjustable pedestal installation | Terraces and roof decks using self-supporting pavers approved for point support | Open joints drain to the sloped waterproof layer and maintained outlets below | Individual units can be lifted for access to drains, membrane, or services |
| Drainage-mat assembly | Bonded or mortar-bed systems where a proprietary capillary drainage layer is specified | Water enters the mat, moves along its designed plane, and exits at a compatible edge or drain | Access depends on the complete bonded assembly; the mat is not automatically serviceable |
A “dry-laid” description also needs clarification. Loose porcelain pavers on sand or crushed aggregate are different from pavers bedded on semi-dry cement mortar, even though both may be called dry installation. One remains unbonded; the other becomes a cementitious assembly. Neither method creates guaranteed permeability, frost resistance, or freedom from efflorescence. Those outcomes depend on the entire water path, materials, climate, joints, and maintenance.
Survey the site before fixing dimensions
- Identify whether the surface is on grade, over occupied space, beside a pool, at a threshold, on steps, or within a vehicle route.
- Record soil or slab condition, settlement, cracks, deflection, waterproofing, drains, overflows, walls, columns, penetrations, railings, and adjacent materials.
- Map the wettest weather, freeze-thaw exposure, deicing salts, heat, shade, leaf fall, irrigation, pool chemicals, and routine cleaning.
- Define pedestrian, furniture, planter, maintenance, impact, and vehicle loads. Do not add cars, concentrated planters, kitchens, tubs, or arbitrary center supports to a roof or pedestal design without verification.
- Check finished height at doors, accessibility transitions, nosings, drain grates, and interiors before ordering pavers.
- Approve a mock-up that includes the real paver, joint, edge, cut, grout or joint fill, cleaning method, and a visible drainage test.

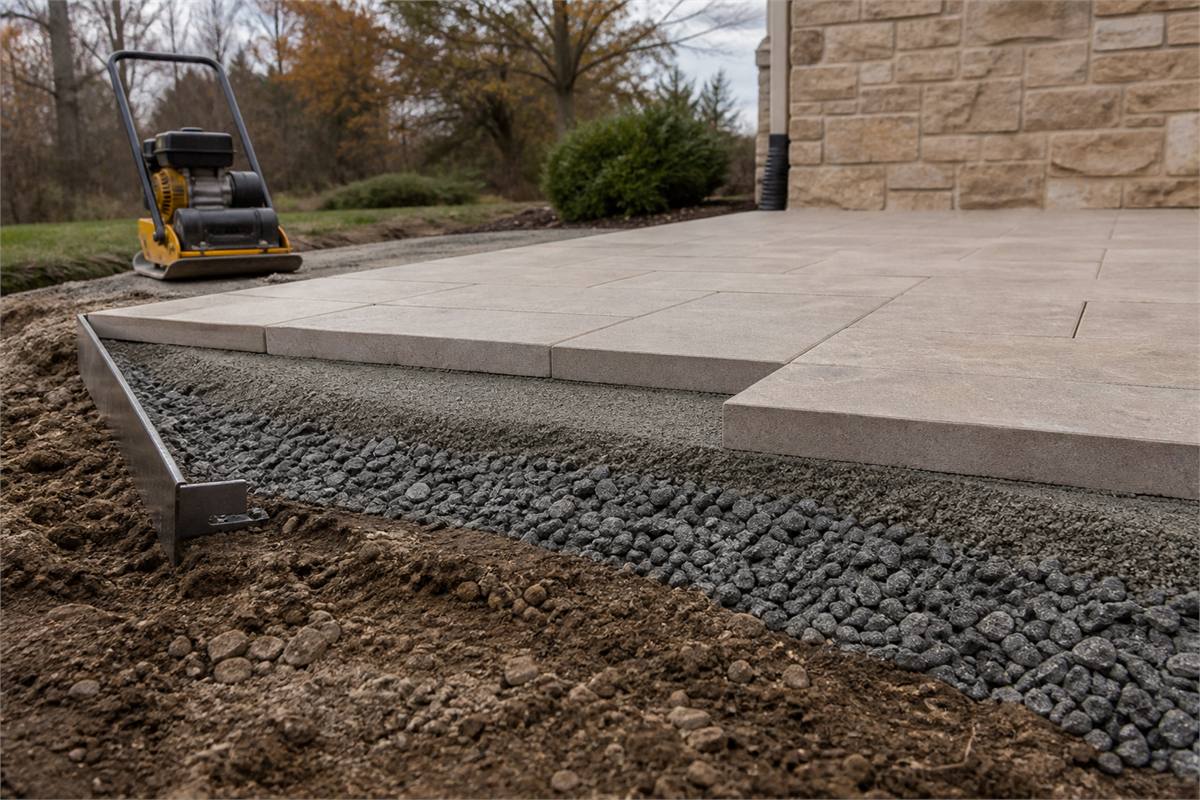
For on-grade construction, the base design follows soil, drainage, frost depth, loading, and the selected paver system. Some project details use a compacted subgrade, graded crushed stone, and bedding layer; others use reinforced concrete. Common figures such as a 70–100 mm concrete layer, an 80–120 mm aggregate layer, or a 30–50 mm mortar bed are examples from particular practices, not universal prescriptions. A local hardscape designer or engineer should set the section and compaction target for the site.
Give water a continuous route out
Water management is more than making the tile face look dry. Surface water needs a fall toward a drain, channel, safe discharge point, or approved infiltration zone. Water that passes through joints or enters at edges needs another continuous route through the assembly. The path must remain open at thresholds, walls, planters, steps, pedestal cavities, drainage mats, and outlet screens.

A fall around 1%–2% is a common design range for some exterior paving assemblies, while other details, accessibility requirements, climates, finishes, and local codes call for different geometry. Treat that number as an early coordination range, not a site instruction. The substrate or waterproof layer—not merely the visible paver surface—must carry water to the intended outlet where the system requires it. Verify formed falls and discharge points before covering them.
Drainage details by system
- Bonded paving: coordinate the surface fall, waterproofing or crack-management layer, mortar coverage, movement joints, perimeter terminations, and drain connection.
- Aggregate paving: confirm that the base remains stable while moving water to an outlet or suitable subgrade. A permeable-looking joint above an impermeable or trapped layer can still hold water.
- Pedestal paving: open joints release water to the layer below. That waterproof layer still needs correct falls, protected drains, overflow capacity, inspection access, and debris control.
- Drainage mat: follow the proprietary system for orientation, overlap, bonding, edge termination, compressive support, and discharge. A mat with no open outlet is not a drainage solution.

Thresholds deserve their own drawing. Finished paving is often kept below the protected interior level, but a single 20–30 mm or 4–6 mm height difference cannot be copied across every door. Door-system instructions, waterproof upstands, accessibility, wind-driven rain, drainage channels, and local code determine the safe transition.

Plan tile joints and movement joints separately
Ordinary joints establish the visual grid and accommodate product tolerances. Movement joints release movement in the tile field and at its boundaries. They do different jobs. A narrow grout line must not bridge an existing structural joint, replace a designed movement joint, or lock paving rigidly against a wall.
Joint widths around 3–8 mm and field movement-joint spacing around 5–8 m appear in some outdoor specifications, but exposure, tile size, solar gain, substrate joints, sealant geometry, building shape, and regional standards can require another arrangement. Keep all existing structural and movement joints continuous as the chosen system requires. Add perimeter and transition accommodation at walls, columns, curbs, thresholds, steps, drains, and changes of plane or material.

The joint filler must match the assembly. Open pedestal joints use spacers and remain drainage gaps. Unbonded aggregate paving may use a compatible jointing aggregate. Bonded paving may use exterior grout plus dedicated resilient movement joints. Semi-dry mortar and drainage-mat assemblies follow their full system details. Do not fill a movement joint with rigid grout, and do not assume indoor resin joint products suit ultraviolet exposure, drainage, joint depth, or thermal movement outdoors.

Prepare bonded and mortar-bed work for full support

- Repair the structural substrate and allow required curing. Remove contamination and weak surface material.
- Form the designed drainage falls with an approved material rather than using thinset for structural repair or large corrections.
- Install the specified waterproofing, crack-isolation, uncoupling, drainage, or mortar-bed components with compatible primers, tapes, drains, and edge details.
- Set control lines around drains, doors, steps, perimeters, movement joints, and visible cuts before mixing mortar.
- Use the exterior-rated mortar, adhesive, grout, and sealant named or approved by the tile and system suppliers.
- Key mortar into the substrate, comb it consistently, coat the paver back when the detail calls for it, and collapse ridges in the instructed direction.
- Lift representative units during installation to inspect transfer, especially at corners and edges. Large-format work needs a base flat enough to achieve support without excessive mortar thickness.
- Clean fresh mortar from the face and joints with the method approved for the finish. Keep drains and movement-joint spaces open.
- Protect the installation from rain, freezing, excessive heat, traffic, and cleaning for the stated cure period.

Semi-dry mortar recipes such as 1:3 cement-to-sand and bed depths around 30–50 mm are common examples in some regional practices. They are not universal mix designs. Cement type, sand grading, water, bonding slurry, reinforcement, drainage, substrate, weather, paver, and cure all affect the assembly. Use the system supplier’s method and a professional installer familiar with the local climate.

Build unbonded aggregate paving as a restrained base
Porcelain should be laid over aggregate only when that exact paver is approved for the method. The subgrade is prepared for the site’s load and drainage; the base is placed and compacted in suitable lifts; the bedding is screeded to the product detail; and the perimeter receives positive edge restraint. The paver should sit evenly without a rocking corner or unsupported span.
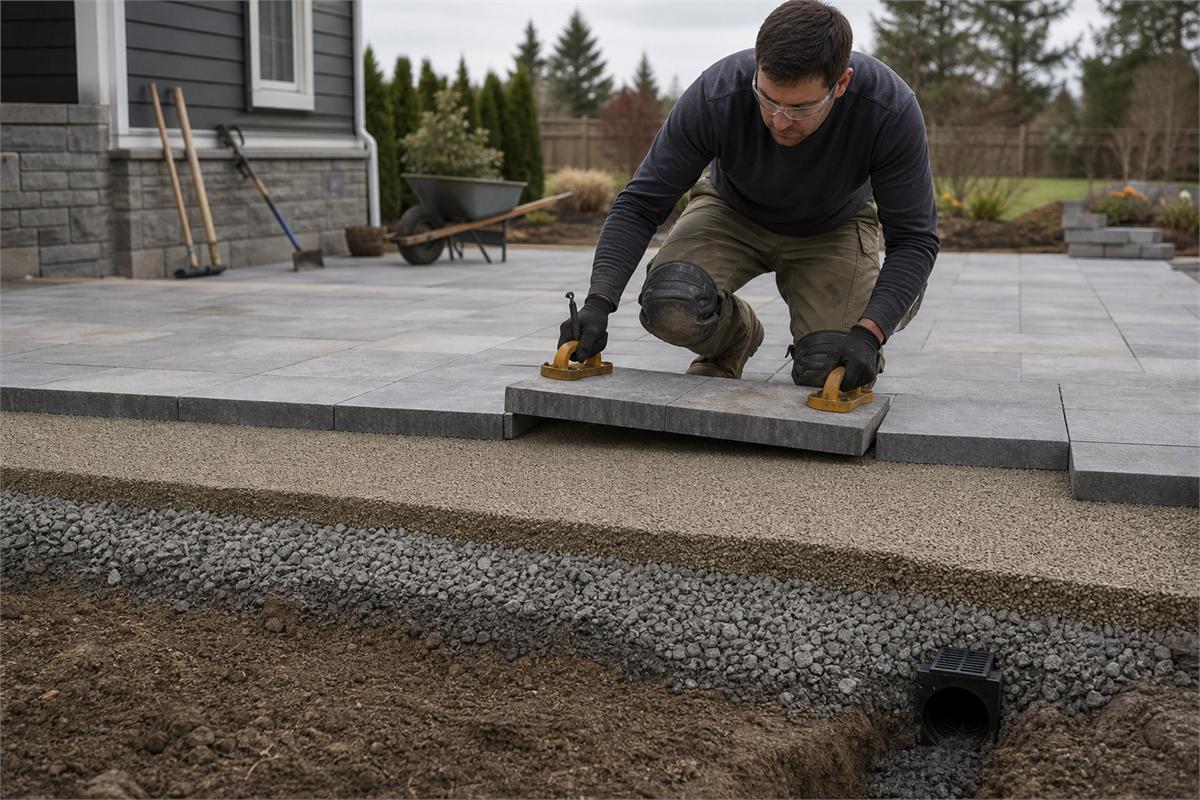
Some guides show 30–50 mm bedding or particular aggregate gradations. Use those dimensions only when they belong to the chosen system and local ground conditions. Do not automatically add a concrete slab beneath a detail intended to infiltrate water, and do not call a decorative sand layer a permeable base without confirming where water goes. Repair usually involves lifting units, correcting bedding or base movement, restoring the joint material, and re-establishing edge restraint and fall.

Treat roof terraces and waterproof decks as building systems
A pedestal terrace can create a beautifully level gathering surface while water drains below and pavers remain accessible. It does not automatically solve structure, waterproofing, wind uplift, edge restraint, fire requirements, guard interfaces, or overflow drainage. Those questions belong to the roof and building design.

- Confirm allowable dead, live, concentrated, maintenance, snow, and planter loads with the structural professional.
- Use only self-supporting pavers approved for the pedestal layout, height, span, and exposure. Support locations follow the paver and pedestal system—not a generic “four corners plus center” rule.
- Protect the roofing membrane with compatible pads or layers where specified; keep penetrations and drainage details within the roofing warranty.
- Coordinate perimeter restraint, corners, cut units, parapets, doors, drains, guards, service routes, and wind design.
- Keep drain and overflow access removable. Provide a maintenance plan for leaves, silt, insects, and debris below the paving.
- Do not place vehicles, heavy planters, outdoor kitchens, spas, or concentrated supports on the deck without a verified structural and system detail.

Flood or ponding tests are sometimes part of a waterproofing specification, with durations such as 24–48 hours appearing in certain projects. The waterproofing designer and manufacturer must set the permitted test, water depth, timing, loading, observation, and acceptance criteria. Do not improvise a flood test on an occupied roof.
Check wet traction without mixing standards
A low absorption value can support frost and stain performance, but it does not prove wet slip resistance. Surface texture, contaminants, slope, footwear, barefoot use, drainage, wear, and maintenance all affect traction. An R classification from a ramp test, a wet dynamic coefficient of friction, and a barefoot test come from different methods and should not be treated as interchangeable numbers.

Review the test method, test condition, product finish, intended use, regional rule, and current manufacturer data together. Then include the real cleaning product, water, and expected contaminants in the project mock-up. If an installed surface becomes unsafe when wet, restrict use and obtain a site-specific assessment rather than relying on the original label alone.
Cut porcelain with silica dust controls
Cutting porcelain and other silica-containing materials can release respirable crystalline silica. Plan cuts before installation and make as many as practical in a controlled area. Use a tile or masonry saw with an integrated water-delivery system, or a tool connected to suitable local extraction and a HEPA-filtered vacuum when the approved work method calls for it. Keep water at the cutting point, manage slurry before it dries, and avoid dry sweeping or compressed-air cleanup.
Workers need task-appropriate eye, hearing, hand, and respiratory protection within the employer’s exposure-control plan and local safety rules. Respirators must be properly selected and fitted when required; they do not replace feasible wet cutting or local extraction. On roofs and elevated terraces, coordinate dust controls with electrical safety, slip prevention, edge protection, and fall protection.

Protect the finish through handover and everyday life
Clean fresh cement residue before it hardens, but use the paver, grout, sealer, and cleaning-product instructions. Protect joints and textured finishes during any pressure washing; high pressure held too close can erode joint material, disturb unbonded bedding, or mark vulnerable edges. Test cleaners on a small inconspicuous area first, and avoid assuming that every acid, alkali, solvent, sealer, or “stone cleaner” suits porcelain, natural quartzite, concrete, and grout equally.
Routine care is usually gentle: sweep leaves and grit, remove spills promptly, keep drains and open joints clear, and wash with the approved neutral cleaner when needed. Light colors can make soil, rust, or leaf tannins more visible; textured finishes may hold more debris. A sample panel helps a household choose the balance of color, texture, wet traction, and cleaning effort that fits real garden life.

Efflorescence is a moisture-and-salt signal, not a porcelain authenticity test. Trace the water source, soluble materials, drainage, and joint condition before selecting a cleaner. Freeze-thaw durability likewise belongs to the whole assembly: product suitability, saturation, support, water escape, jointing, and climate all matter.

Inspect the system, not just the surface
| Warning sign | Question to investigate | Useful first response |
|---|---|---|
| Water remains in isolated areas | Surface fall, blocked outlet, threshold, joint, or drainage layer | Map low points and stop covering untested areas |
| A paver rocks or a bonded corner sounds loose | Base support, mortar transfer, open time, flatness, or pedestal layout | Lift a representative removable unit or arrange a controlled investigation |
| Cracks repeat a straight substrate line | Structural joint continuation, reflective cracking, or missing movement accommodation | Review drawings and substrate before cosmetic repair |
| White deposits appear at joints | Moisture route and soluble salts | Trace water and drainage before cleaning |
| Edges chip or cuts move | Edge restraint, unsupported cuts, point loading, or movement | Restrict the area and inspect the termination detail |
| The surface feels unsafe when wet | Finish, contamination, wear, slope, drainage, and use condition | Restrict use, clean by the approved method, and obtain a site assessment |
Keep product labels, batch information, layout drawings, substrate and waterproofing photographs, drainage routes, outlet locations, pedestal layout, mortar and grout records, movement-joint positions, weather notes, mock-up approval, cleaning guidance, warranties, and spare pavers. These records make a future repair more precise and help preserve the peaceful surface the home was designed to enjoy.

The Eastern Story care guide offers conservative care principles for decorative materials, while installed paving should follow its own system manufacturers. For decorative crystal objects placed near a terrace, use the separate clear quartz guide rather than applying paving products to them.
A calm outdoor room begins below the pavers
The most reliable outdoor quartz tile installation is not the one with the most impressive single specification. It is the one in which every layer has a clear job: the product matches the use, the support matches the load, water can leave, movement has space, edges are restrained, cuts are controlled, and maintenance remains practical. When those decisions come together, the patio can quietly support morning tea, family meals, garden seasons, and the enduring wish that everything at home may unfold with ease.
Frequently Asked Questions
Related Posts


